Grasp the cervix using a Jacobs vulsellum tenaculum. Use of a single tenaculum allows for much more movement than the use of instruments placed anteriorly and posteriorly. The Jacobs tenaculum obtains a better purchase on the tissue than a single tooth and is considerably less likely to tear through the tissue.
Before beginning the hysterectomy, locate the uterosacral ligaments and inject each one at its junction with the cervix, aspirating slightly before infiltrating the ligament with 0.25% to 0.50% bupivacaine with epinephrine, with dilute vasopressin mixed in. (I place 1 unit in 20 mL of the local solution.) Injection of this solution achieves 2 goals:
- improved intraoperative hemostasis
- postoperative pain relief.
Use a short needle with a needle extender attached to a control syringe rather than a spinal needle for greater control.
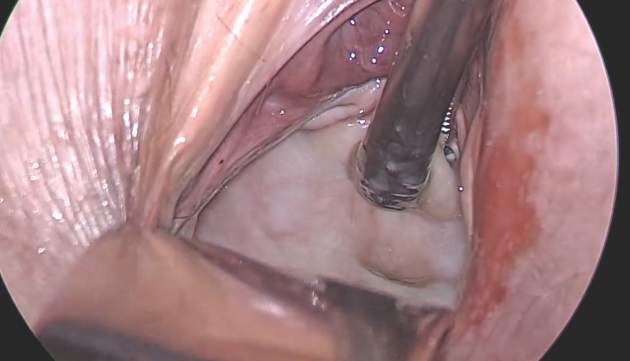
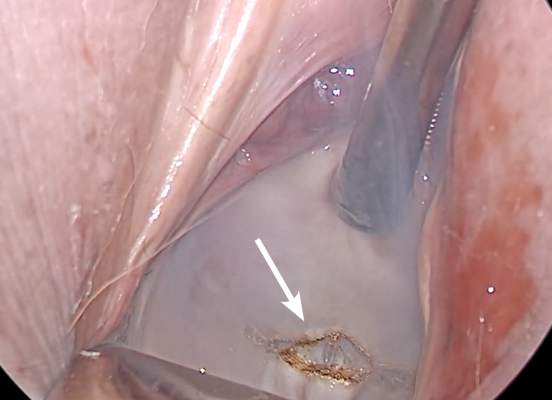
Before entering the peritoneal cavity, create a right angle with the Jacobs tenaculum and Deaver retractor in relation to the surgical field (FIGURE 1). This right angle is difficult to achieve when you are using a weighted speculum in a tight vagina. Once you have a right angle, tent the vaginal tissue in the midline (FIGURE 2).
In a nulliparous patient or a woman with a tight pelvis, you may discover that the peritoneum is pulled up between the uterosacral ligaments. One common pitfall arises when the surgeon, having dissected the vaginal epithelium, continues cutting into the vaginal epithelium instead of reaching into the peritoneal cavity. Palpate the tissue to ensure that there is no bowel in the way and stay at right angles while confidently grasping the peritoneum with a toothed forceps.
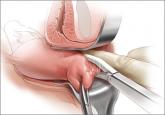
I like to use a bit of electrosurgery to incise the vaginal wall. I don’t begin at the cervix but incise more distally into the vaginal epithelium approximately 2 cm from the cervicovaginal junction. This strategy prevents dissection into the cervix and/or rectovaginal septum rather than the posterior
cul-de-sac (FIGURE 3).
Once the incision is made, it is possible to feel the posterior peritoneum. And as you tent the peritoneum, you can then very confidently extend the incision and enter the cavity posteriorly.
In a patient with significant adhesions such as this one, I feel around posteriorly to determine exactly where I am. One tactic I use is to release the tenaculum and regrasp the cervix with it. This allows for improved visualization and movement of the cervix as the procedure progresses. Depending on the case, it may be necessary to insert a sponge to hold bowel out of the way.
Move the Deaver retractor to the anterior position, switch the Jacobs clamp to the anterior cervix, and pull straight down. Now that you have incised the vaginal epithelium posteriorly, the length of the cervix should be apparent to you, and you can easily determine the location of the bladder reflection.
Keep in mind that, in a postmenopausal patient, there will be fewer vaginal rugae to guide you. Place the Jacobs tenaculum as close to the midline as possible so that you can confidently grab the tissue without fear of grabbing the bladder. If you tilt the Jacobs clamp, you can feel the edge of the bladder reflection. Remember that postmenopausal patients with prolapse (or, occasionally, obese patients with cervical elongation but little actual descensus) may have altered anatomy.
You can create a bit more space in which to dissect by injecting the bupivacaine/
epinephrine solution into the vaginal epithelium. This technique also ensures that the vaginal epithelial incisions won’t bleed.
Now, tilt the Jacobs tenaculum downward and push the junction of the cervix with the bladder reflection toward you so that you have a good sense of how deeply to incise.
Once you’ve made the incision, reclamp the Jacobs tenaculum so that it holds all of that tissue, and repeat the maneuver, tilting the clamp downward and pushing the junction toward you. In this way, you create traction and countertraction, sweeping the tissue out of your way.
Always use sharp dissection. When adhesions are present, surgeons often get into trouble using blunt dissection and may inadvertently enter the bladder if they use a sponge-covered digit for dissection, because adhesions can be much denser than normal tissue. In such cases, the bladder tears open rather than the adhesions being swept away.